Skip to content

Amazon Mechanical Turk Quick Intro

I’ve read a bit about Amazon’s Mechanical Turk, and it sounds like a very interesting technology. It is a market place to put up little tasks for workers around the world to complete, i.e tag a photo, categorize this dress, find an email for the business, etc. Now I’m wondering what interface you have to create tasks, does it work like a facebook app where I host the logic? Finally got around to reading up on it, so here’s the quick intro for the techie that doesn’t feel like reading the manual. 🙂

Creating some tasks is very simple, you just create a HTML template with placeholders like this: ${placeholder}, and some HTML elements. Upload a CSV to ‘mail merge’ with the template, and workers get displayed 1 task for each row in the CSV. Any data entered into the form fields are saved and available for download.

I came up with an idea for mturk tasks while I was testing an ipad magazine app at work. The app contains bitmaps exported for the PDF files to create the magazines, so there is no metadata to create hotspots on the index page. The idea: put the index pages up on mturk for workers to draw the hotspots. The workers only interact with the HTML in the template, so it is an option to write some javascript to draw the rectangle and store the co-ordinates in hidden form fields.

I want to take 1 index page, and get a rectangle for each page reference. I’m not really using mturk to its fullest if I give 1 worker a JPG, and have the worker draw multiple rectangles. It would be better to “scale” the task over multiple workers. So instead I type all the page numbers into the CSV (this could also be another task!), and each “task” displays the worker a single page number, and asks them to draw the rectangle. Slight problem, what if a page number is listed more than once? Now I have three columns in my csv:

  • pageNumber – the page number I want the workers to find
  • pageCount – the number of times the page appears
  • pageUrl – the location of the scanned page

If a page appears multiple times I give the worker multiple rectangles to highlight the page.

So what’s it look like? The ‘Design’ tab is used to set up the template
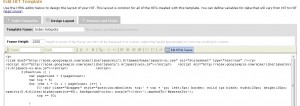
I upload the CSV, and the task appears for workers to complete.

I get a UI of the results in real time, the tasks complete pretty quickly. I can click the results button and see a grid of the results. You can also reject the results you see in the grid, and put the task back to the workers for completion.

See the rectangles drawn on the index page:

There is a bit of an overlap on the rectangles, so I wrote a bit of code to ‘split the difference’ of any overlap. See the results here.

Further reading:

  1. Creating a HIT Template – a good reference from Amazon on the workings of a HIT created in the UI.
  2. API reference – it is possible to host the IFRAME yourself using an ExternalQuestion

LINQ mucking

Another quick one! Forcing myself to learn LINQ, so I decided to rewrite some looping code. The original code; simple enough, loop thru all the daylight adjustments for a timezone and build a list of date/time and offset.

List<TransitionOffset> transitions = new List<TransitionOffset>();
foreach (TimeZoneInfo.AdjustmentRule adj in TimeZoneInfo.FindSystemTimeZoneById("AUS Eastern Standard Time").GetAdjustmentRules())
{
    if (adj.DateEnd.Year >= 2010)
    {
        for (int year = 2010; year <= 2015; year++)
        {
            transitions.Add(new TransitionOffset
            {
                Transition = GetDateTime(year, adj.DaylightTransitionStart),
                Offset = adj.DaylightDelta.TotalHours
            });
            transitions.Add(new TransitionOffset
            {
                Transition = GetDateTime(year, adj.DaylightTransitionEnd),
                Offset = 0
            });

        }
    }
}
transitions = transitions.OrderBy(t => t.Transition).ToList();

..and again in LINQ

var zoneAdjs = from adj in TimeZoneInfo.FindSystemTimeZoneById("AUS Eastern Standard Time").GetAdjustmentRules()
                where adj.DateEnd.Year >= 2010
                from year in Enumerable.Range(2010, 6)
                let trans = new[] { 
                                        new { Transition = GetDateTime(year, adj.DaylightTransitionEnd), 
                                            Offset = 0.0},
                                        new { Transition = GetDateTime(year, adj.DaylightTransitionStart),
                                        Offset = adj.DaylightDelta.TotalHours}
                                    }
                from tran in trans
                orderby tran.Transition
                select tran;

Any more readable / maintainable than the non-LINQ version? It definitely took longer to write while I’m a LINQ “newbie”. The most complicated bit was pulling the DaylightTransitionEnd and DaylightTransitionStart into one collection. This collection is only ever used to create JSON, so I like being able to serialize anonymous types from LINQ, and skip creating classes that are only used to serialize.

TwitterHeatmap.com

I had some time on the weekend to do some coding, so I “finished” a project I’ve spent a few nights playing with.

The idea was to pull together some visualization of the twitter sample feed.   A work colleague (spud) suggested a heatmap where the points fade out over a few frames.  And here it is: http://twitterheatmap.com/

I’ve got an EXE running on an EC2 micro instance dropping XML files of all the tweets into a folder.  Another EXE fires once a day at midnight UTC, generates the JPGs, creates an AVI (with VirtualDub), and uploads the video to youtube.   The data you see live right now is a bit flakey – displaying a fail whale where I don’t have any data. 🙂

Grabbed a lot of handy code off the net to build this:

App Engine’s High-Performance Image Serving

Real quick blog post while I eat my lunch….

Google released a SDK 1.3.6 for App Engine yesterday: Google App Engine Blog: Multi-tenancy Support, High Performance Image Serving, Increased Datastore Quotas and More Delivered In New App Engine Release. Of particular interest to me was the High Performance Image Serving.

High-Performance Image Serving This release also includes a new, high-performance image serving system for your applications, based on the same infrastructure we use to serve images for Picasa. This feature allows you to generate a stable, dedicated URL for serving web-suitable image thumbnails … This special URL can serve that image resized and/or cropped automatically, and serving from this URL does not incur any CPU or dynamic serving load on your application (though bandwidth is still charged as usual).

So I store some images in an App Engine blob, pass this to get_serving_url and Google give me back a URL for the ‘high performance’ location. I was just interested to see what the URL would look like, and where it would actually be hosted. So I whipped up something real quick to grab the URL ..and here’s what it looks like:

http://lh5.ggpht.com/FIl4UGix2IbadeLOotXq2CgIF4Wi4xUSaSegSDSrfnIy5YyQlZWWaPcDRhyxkJTGepVkxNHUVcv8o1_1zWazbg=s200

Note this URL has the “=s200” parameter to scale the image down to 200px wide. You can also pass along a crop parameter to crop the image down to a small square, e.g: =s200-c

The code is a hacked up version of the image upload and blob storage examples.

from google.appengine.ext import blobstore
from google.appengine.ext.webapp import blobstore_handlers
from google.appengine.api import images
from google.appengine.api import urlfetch
from google.appengine.ext import webapp
from google.appengine.ext.webapp.util import run_wsgi_app
from google.appengine.ext import db

class ImageModel(db.Model):
    image = db.BlobProperty()


class MainPage(webapp.RequestHandler):
	def get(self):
		upload_url = blobstore.create_upload_url('/upload')

		self.response.out.write("""<html><head><title>High Performance Image Tester</title></head>""");
		self.response.out.write("""<body>""");
		self.response.out.write("""
				<form action="%s" enctype="multipart/form-data" method="post">
				<div><label>Image:</label></div>
				<div><input type="file" name="file"/></div>
				<div><input type="submit" value="Upload"></div>
				</form>
			</body>
			</html>""" % upload_url)


class UploadHandler(blobstore_handlers.BlobstoreUploadHandler):
    def post(self):
        upload_files = self.get_uploads('file')  # 'file' is file upload field in the form
        blob_info = upload_files[0]
        self.redirect('/serve/%s' % blob_info.key())

class ServeHandler(webapp.RequestHandler):
	def get(self,resource):
		self.response.out.write("%s %s %s" % (images.get_serving_url(resource, 32),
		images.get_serving_url(resource, 150),
		images.get_serving_url(resource, 80)))

application = webapp.WSGIApplication(
	[('/', MainPage),
	('/upload', UploadHandler),
	('/serve/([^/]+)?', ServeHandler)],

	debug=True)

def main():
	run_wsgi_app(application)

if __name__ == "__main__":
	main()