Skip to content

SSL + Man-in-the-Middle

Spent some time reading up on SSL and how it defends against against the ‘man-in-the-middle‘ attack. All the pieces to the puzzle were there in my previous post – I just needed a good reference on the protocol. The best references I found were:

Examining the protocol reveals how SSL defends against a man-in-the-middle attack.

ClientHello: SSL version number, cipher settings, randomly generated data
ServerHello: SSL version number, cipher settings, randomly generated data, server certificate. The server certificate contains the server’s public key.
ClientKeyExchange: premaster secret for the session – derived from a hash of all the communcations to this point. This is sent encrypted with the server’s public key. The server decrypts this, and ensures the hash matches its own hash of the communcations.
The client and server both create a session key to be used for the remainder of the session. The session key is derived from the premaster secret, client random data, and server random data.
ChangeCipherSpec: Finshed
HTTP GET (communcations now encrypted with the established session key)

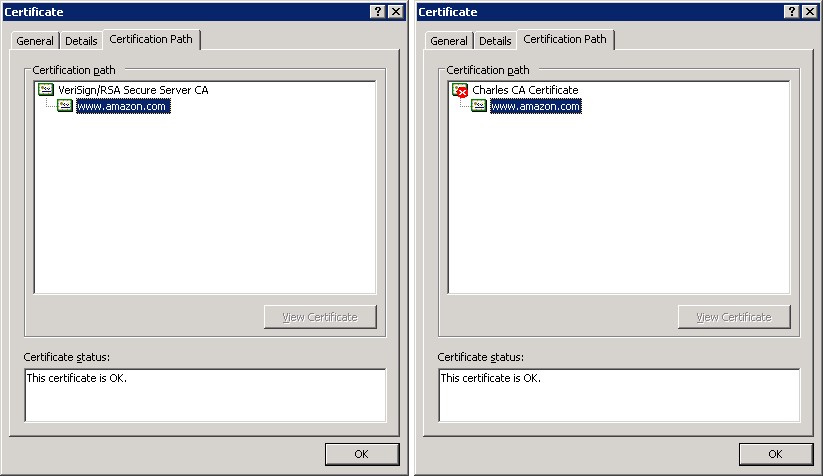
The server certifcate delivered in the ServerHello is signed by a trusted certifcate authority (CA). The client tests this signature against its own list of CA public keys. The server certifcate also contains the domain name of the server. This is used to confirm you have the certicate that has been authorised by an authority for the website located at amazon.com. If the certificate does not pass either criteria your browser will give you a warning.

If an attacker did sit in between your browser and a server and they passed along the certificate in the ServerHello – they wouldn’t be able to decrypt the ClientKeyExchange. As this has been encrypted with the server’s public key – and the attacker is only in posession of the public key. It is possible for the attacker to substitue their own certificate in this step. But the browser will issue a warning if the certificate isn’t:

  • signed by a trusted authority,
  • and certificate’s domain matches the site the client is connecting to.

As you may have already guessed: To have your server certificate signed by a trusted CA’s (like Verign, Thawte and Comodo) you have to provide evidence you own the domain! The other weakness is the list of trusted authorities you have installed in your browser. As mention by Steve Gibson in the Security Now podcast (episode 36) some corporate environments have inserted their own CA certificate in the client installations exactly so they can perform a man-in-the-attack to filter content at the proxy.

Now, there is an exception, though, which is the other reason I put this question in here today, because when you connect to a remote server you are accepting the credentials of the server, which has been signed by someone who signed their certificate, like we were talking about briefly before, about VeriSign, for example, signing GRC’s certificate. Some corporations do want to proxy and filter and literally basically decrypt and be able to read their employees’ encrypted traffic. So what they do is they run a proxy server in their corporate environment, which has a certificate. And every browser in the company has been told to trust that certificate. So essentially the encrypted traffic is decrypted at the corporate border.

It’s decrypted at the corporate border and then, essentially, filtered, proxied, checked for spyware, or even for naughty content. I mean, they could do anything they want to once they’ve got your connection decrypted. Then it is reencrypted using a certificate that every corporate browser has been deliberately installed with in order for the browser not to complain. So employees may believe they have encrypted and secure SSL connections, when in fact it is being decrypted in, you know, en route, essentially, you know, by their corporate firewall or IT staff or proxy server for whatever corporate reasons.

Which finally does explain how SSL defends against this attack!

Charles Proxy

Checking out Charles Web Debugging Proxy while I’m having a bit of a look under of the hood of SSL-Explorer. Snooping on an a SSL session works straight out of the box. Must be using a ‘man-in-the-middle‘ method to sit between me an the SSL website.

Yet, when I access https://www.amazon.com via Charles Proxy I get a warning about the certificate. Viewing the certificate ‘certification path’ shows that the content coming from the proxy has been encrypted with a certificate signed by ‘Charles CA Certificate’.

Left: without the proxy. Right: with Charles Proxy.

I know SSL does protect itself against a man-in-the-middle attack – but I don’t know exactly how this works. There’s an SSL certificate on the server that’s been signed by a ‘certificate authority (CA)’ – and your browser contains public keys of the trusted CAs (IE: Tools -> Options -> Content -> Certificates -> Trusted Root Certification Authorities, Firefox: Tools -> Options -> Advanced -> Security -> View Certificates -> Authorities). How do these pieces fit together to protect against this attack?

More material for a blog post – stay tuned for the update. In the mean time I’ll be translating this:

    SSL 3.0 includes support for ephemerally-keyed
    Diffie-Hellman key-exchange. Since Diffie-Hellman
    is the only public key algorithm known which can
    effciently provide perfect forward secrecy, this is
    an excellent addition to SSL. In a SSL 3.0 Diffie-
    Hellman key-exchange, the server specifes its Diffie-
    Hellman exponent as well as the prime modulus and
    generator. To avoid server-generated trapdoors, the
    client should be careful to check that the modulus
    and generator are from a fixed public list of safe
    values. The well-known man-in-the-middle attack is
    prevented in SSL 3.0 by requiring the server’s Diffie-
    Hellman exponential to be authenticated.

    (Bruce Schneier – Analysis of the SSL 3.0 Protocol)

My SSL-Explorer Questions Answered

My previous post Remote Desktop + SSH/Putty covered one approach for accessing your home PC via a strong security, strong encryption SSH tunnel. SSL-Explorer from 3SP also looks like a very simple way to remotely access your PC. I first heard of this project when it was mentioned on Steve Gibson’s ‘Security Now!’ podcast (episode 15). There is also a review on Tom’s Networking: A DIY SSL VPN with SSL-Explorer, and part 2. After reading the review I was left with a few questions, and sensing some material for a blog article. I’m about to install SSL-Explorer on a spare PC: and try answering some of my questions.

SSL-Explorer is an web-based SSL VPN server. A VPN exists for a secure external access to resources you have one your network. Perfect for ‘roadwarrior’ staff to access internal files and desktops from external sites, such as a hotel room, or home. SSL-Explorer provides this though a web-browser interface.

Once installed you get a web-based admin to administer the application – create users, set-up permissions, and configure the resources that will be made available to the users. A user connects via a browser, after logging-in they are presented a simple screen displaying the resources they have access to. Users can access the web securely, view Remote Desktops, and transfer files all via SSL-Explorer.


SSL-Explorer’s User Console displaying the ‘Applications’ available to the user.

The fresh install allows me to create: Web Forwards, Network Places, Applications, and SSL Tunnels. My first question was: how exactly do you make applications available via a web browser? The Tom’s Hardware article goes through the steps of creating a VNC connection back to a server behind the firewall in the section “Checking out Remote Desktop“. More questions:

  • Where is this VNC executing?
  • If it is executing on the client:
    • How did it get there?
    • How can it connect to the VNC behind the firewall?

Trying this out on my own set-up: in the admininstration I first set-up the VNC application short cut. I’m presented will a lot of options for the short cut:

Logging into the website as a ‘user’ I now have an option to launch VNC. Launching the app reveals an extra component to the SSL-Explorer application: the SSL-Explorer Agent. The first time I attempt to launch the VNC application from the web console – I’m prompted to install a signed java applet. This launches the SSL-Explorer Agent on my client.

The SSL-Explorer Agent has:

  • copied the application down to my PC (a search finds the application in %USERPROFILE%\.sslexplorer\applications),
  • created a tunnel port on the client PC,
  • and launched the VNC application with the command line options to connect to the tunnel port.

So the application sharing is conceptually very similar to using SSH tunnels to connect to a server behind a firewall. VNC is connecting a tunnel port on the local machine created by SSL-Explorer Agent. The agent is transferring this data to the SSL-Explorer application via SSL – which then transfers the data to and from the VNC server. SSL-Explorer is wrapping this up in a nice web interface. Not all applications are suitable to be shared this way. To work, an application needs to:

  • Be the client in a TCP client/server environment, i.e. Remote Desktop, VNC, Putty.
  • Allow the server address and port to be ‘fed in’ to the app, either via a command line argument, or config file. This is how the SSL-Explorer Agent tells the client to connect to the local tunnel port. The multitude of options available when creating the VNC shortcut is used to create a VNC parameter file on the client machine. This rules out MSN Messenger and Skype as they are ‘hardcoded’ with their server address and port.

Notably all the applications that come out of the box prompt the user for a password when a password is not present in the command line or config. Presumably this is preferable to leaving a password on the client machine.

Well that’s answered the initial questions I had of SSL-Explorer, and has given me some more questions for my next blog post. Maybe try my hand at creating my own application extension? I’ve had a quick look around for a minimal Jabber client which meets all the criteria, may play a bit more with that. Also thinking of using a snooping proxy to see what is actually going over the HTTPS wire (Charles Proxy is capable of this). If someone were given an account without any tunnels setup – could you falsify the server traffic to have the agent create a tunnel?

Importing the Geo-Names database into MsSql Server

Update (26-Jul-2009): This article is now a little outdated. The table now has some extra columns. Have a look at Loading GeoNames Data Into SQL Server 2008 by EdKatibah for an up-to-date approach. I’ve successfully imported the newest allCountries.txt with the following steps:

  1. UNIX2DOS to update the line endings of AllCountries.txt
  2. Same nant script below to convert AllCountries.txt to UNICODE
  3. CREATE TABLE now looks like this:

    CREATE TABLE [GeoNames] (
        [GeonameID] [int] NOT NULL ,
        [Name] [nvarchar] (200) NOT NULL ,
        [AnsiName] [varchar] (200) NULL ,
        [AlternateNames] [nvarchar] (MAX) NULL ,
        [Latitude] [float] NOT NULL ,
        [Longitude] [float] NOT NULL ,
        [FeatureClass] [char] (1) NULL ,
        [FeatureCode] [varchar] (10) NULL ,
        [CountryCode] [char] (2) NULL ,
        [CC2] [varchar] (60) NULL ,
        [Admin1Code] [varchar] (20) NULL ,
        [Admin2Code] [varchar] (80) NULL ,
        [Admin3Code] [varchar] (20) NULL ,
        [Admin4Code] [varchar] (20) NULL ,
        [Population] [bigint] NOT NULL ,
        [Elevation] [int] NULL ,
        [GTopo30] [int] NULL ,
        [Timezone] [varchar] (50) NULL ,
        [ModificationDate] [datetime] NULL 
    ) 
  4. EdKatibah’s BULK INSERT works nicely:

    BULK INSERT GeoNames
    FROM 'D:\Developer\Geonames\allCountries_unicode.txt'
    WITH(
       DATAFILETYPE = 'widechar',
       FIELDTERMINATOR = '\t',
       ROWTERMINATOR = '\n'
    )
    GO 

Using BULK INSERT to load the data is MUCH nicer than using BCP. As BULK INSERT will actually tell you where and WHY and import failed. I was originally trying to do this with BCP. I had DECIMAL types for latitude and longitude – which resulted in an infuriating error because a handful of rows have scientific notation representation.


Geo-Names “provides free geo-data such as geographical names and postal codes. The database contains over 6 million entries for geographical names whereof 2.2 million cities and villages”. The offer their content via a webservice, and as a database download.

I’m using a subset of this data for my ‘learn ASP.NET 2.0’ project, so I’ve imported the database export into my SQL Server. Here’s the steps I followed:

  • Create a table that looks like this (note the nvarchar columns for the extendend characters):
    
    CREATE TABLE [CityNames] (
        [GeonameID] [int] NOT NULL ,
        [Name] [nvarchar] (200) NOT NULL ,
        [AnsiName] [varchar] (200) NOT NULL ,
        [Latitude] [decimal](18, 15) NOT NULL ,
        [Longitude] [decimal](18, 15) NOT NULL ,
        [FeatureCode] [varchar] (10) NULL ,
        [CountryCode] [char] (2) NULL ,
        [Admin1Code] [varchar] (20) NULL ,
        [Population] [int] NOT NULL 
    ) 
    
    
  • The database export is a UTF8 file – MSSQL DTS import wants a UTF16 file. Easy to convert a file by opening it in Textpad/VS.Net and using ‘Save As’ to change the encoding. Not so easy with the 500meg ‘allCountries’ file. The nant copy task works well for this:

    <target name="build">
        <copy file="allCountries.txt" 
        todir="Converted" inputencoding="UTF-8" 
        outputencoding="UNICODE"/>
    </target>
  • Import the converted file via the DTS Import/Export Wizard. In Enterprise Manager right-click the database > All Tasks > Import Data…
  • Follow the prompts to import the converted file. On the file format screen select the following options: File Type = Unicode, Row Delimeter = {LF}, Text Qualifer = .

  • If all the names look neatly lined up on the next screen your file has imported okay.

  • In the next two steps select the destination database / table created in the first step.
  • Just to make sure all the UTF-16 content has come across okay – jump into Query Analyzer and run something like this:

    SELECT AlternateNames FROM GeoNames WHERE GeonameID=2147714